
Ultimate Guide to Photographing the Perseids Meteor Shower
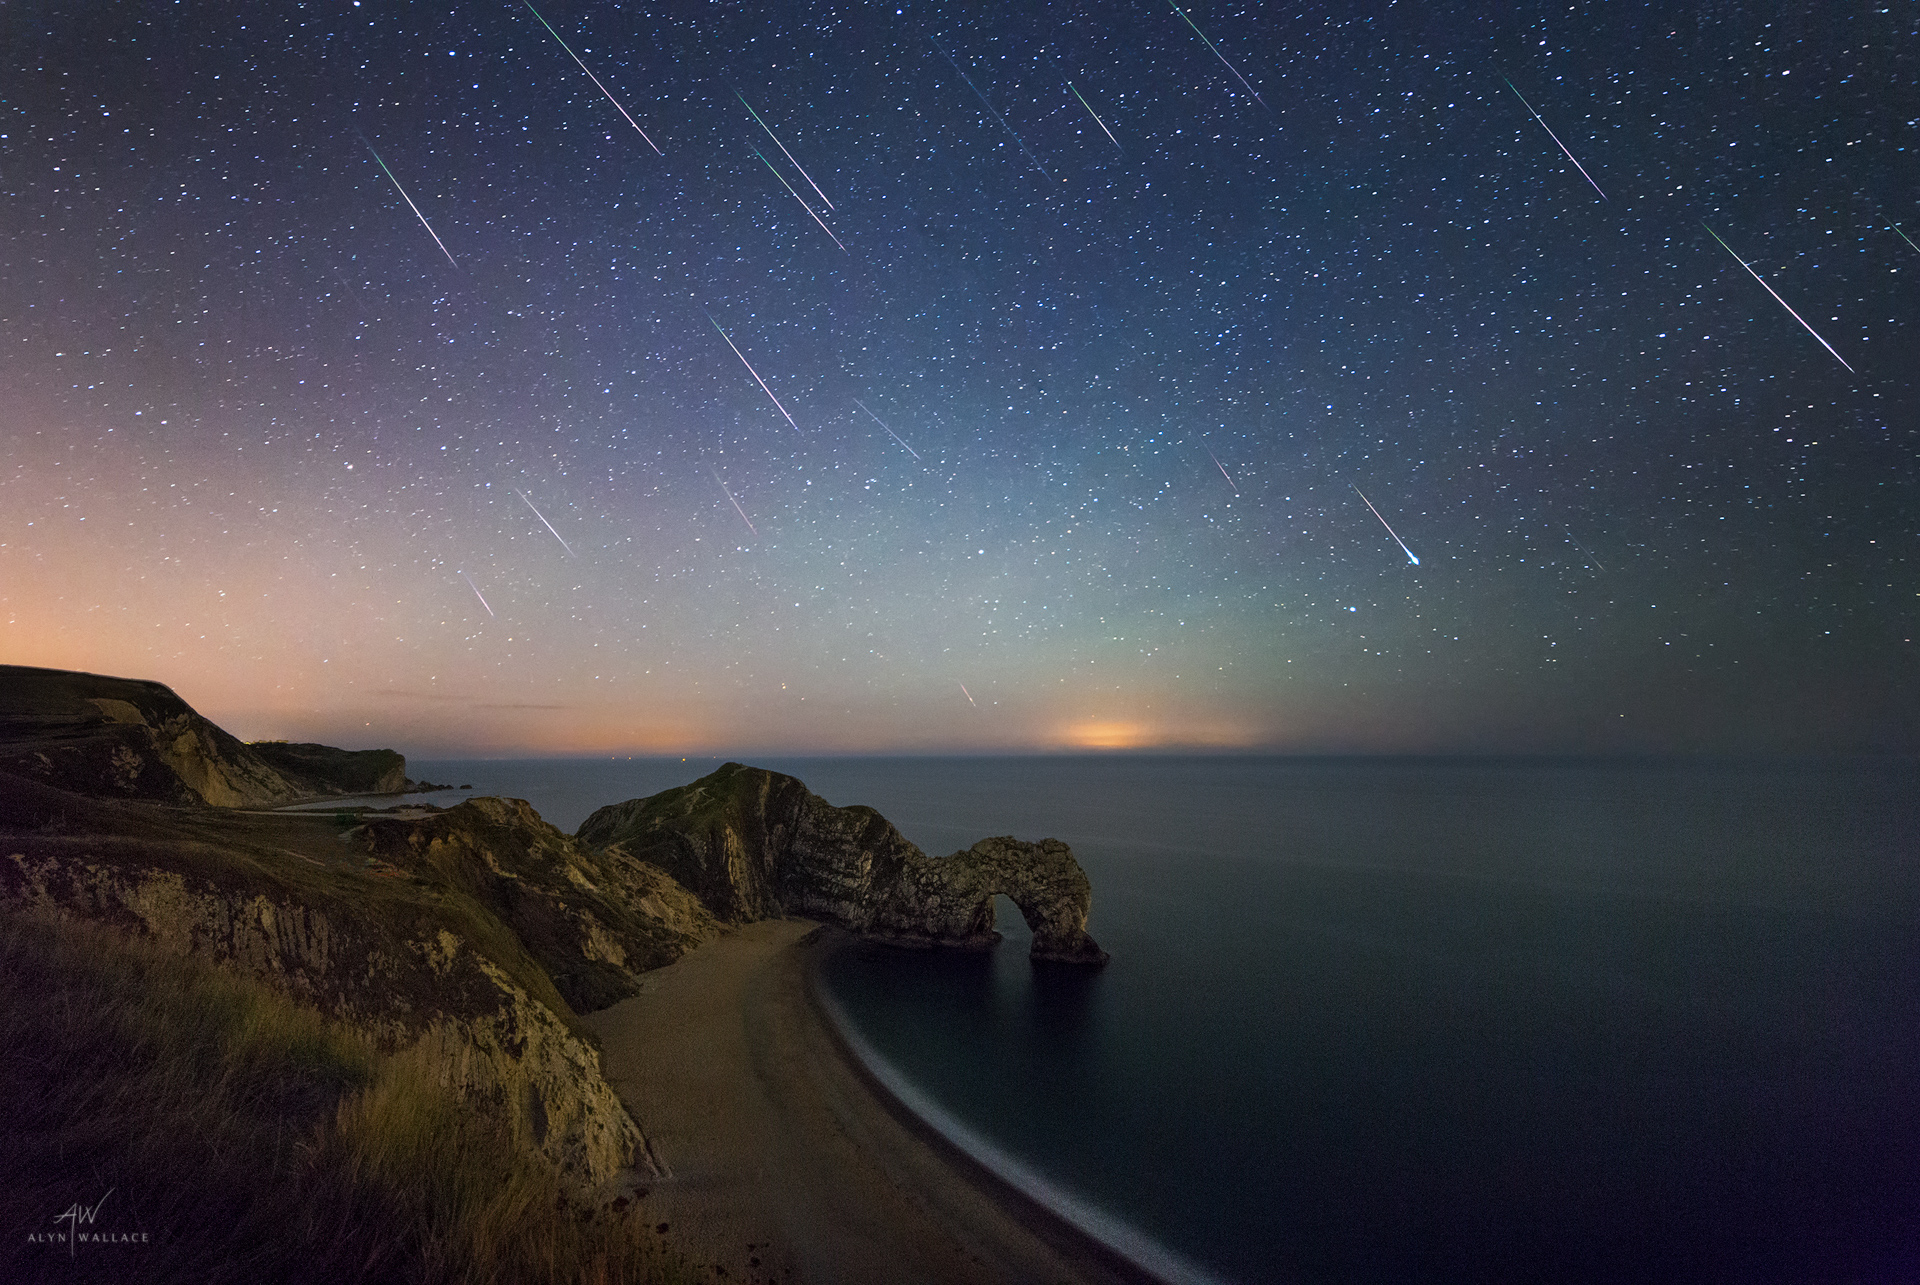
A 2-hour collection of Perseid's above Durdle Door from the night of the peak
As the Northern Hemisphere summer nights lengthen the darkening skies are lit up by one of the most anticipated meteor showers of the astro calendar - the Perseids. Earth enters a stream of debris left in the wake of comet Swift-Tuttle around mid July, with activity peaking around August 12th when stargazers can typically enjoy upwards of 60 meteors per hour from dark locations. With the promise of a warm summer's night it can easily be one of the most enjoyable meteor showers of the year and this year the night of the peak falls on the new moon, so you can enjoy the spectacle unhindered from dusk til dawn.
The Perseids are active from roughly July 17 to August 24 but activity peaks around August 11-13 where hourly rates increase significantly. Some years, such as 2016, bring about what's known as an outburst where rates shoot up to 150-200 meteors an hour!
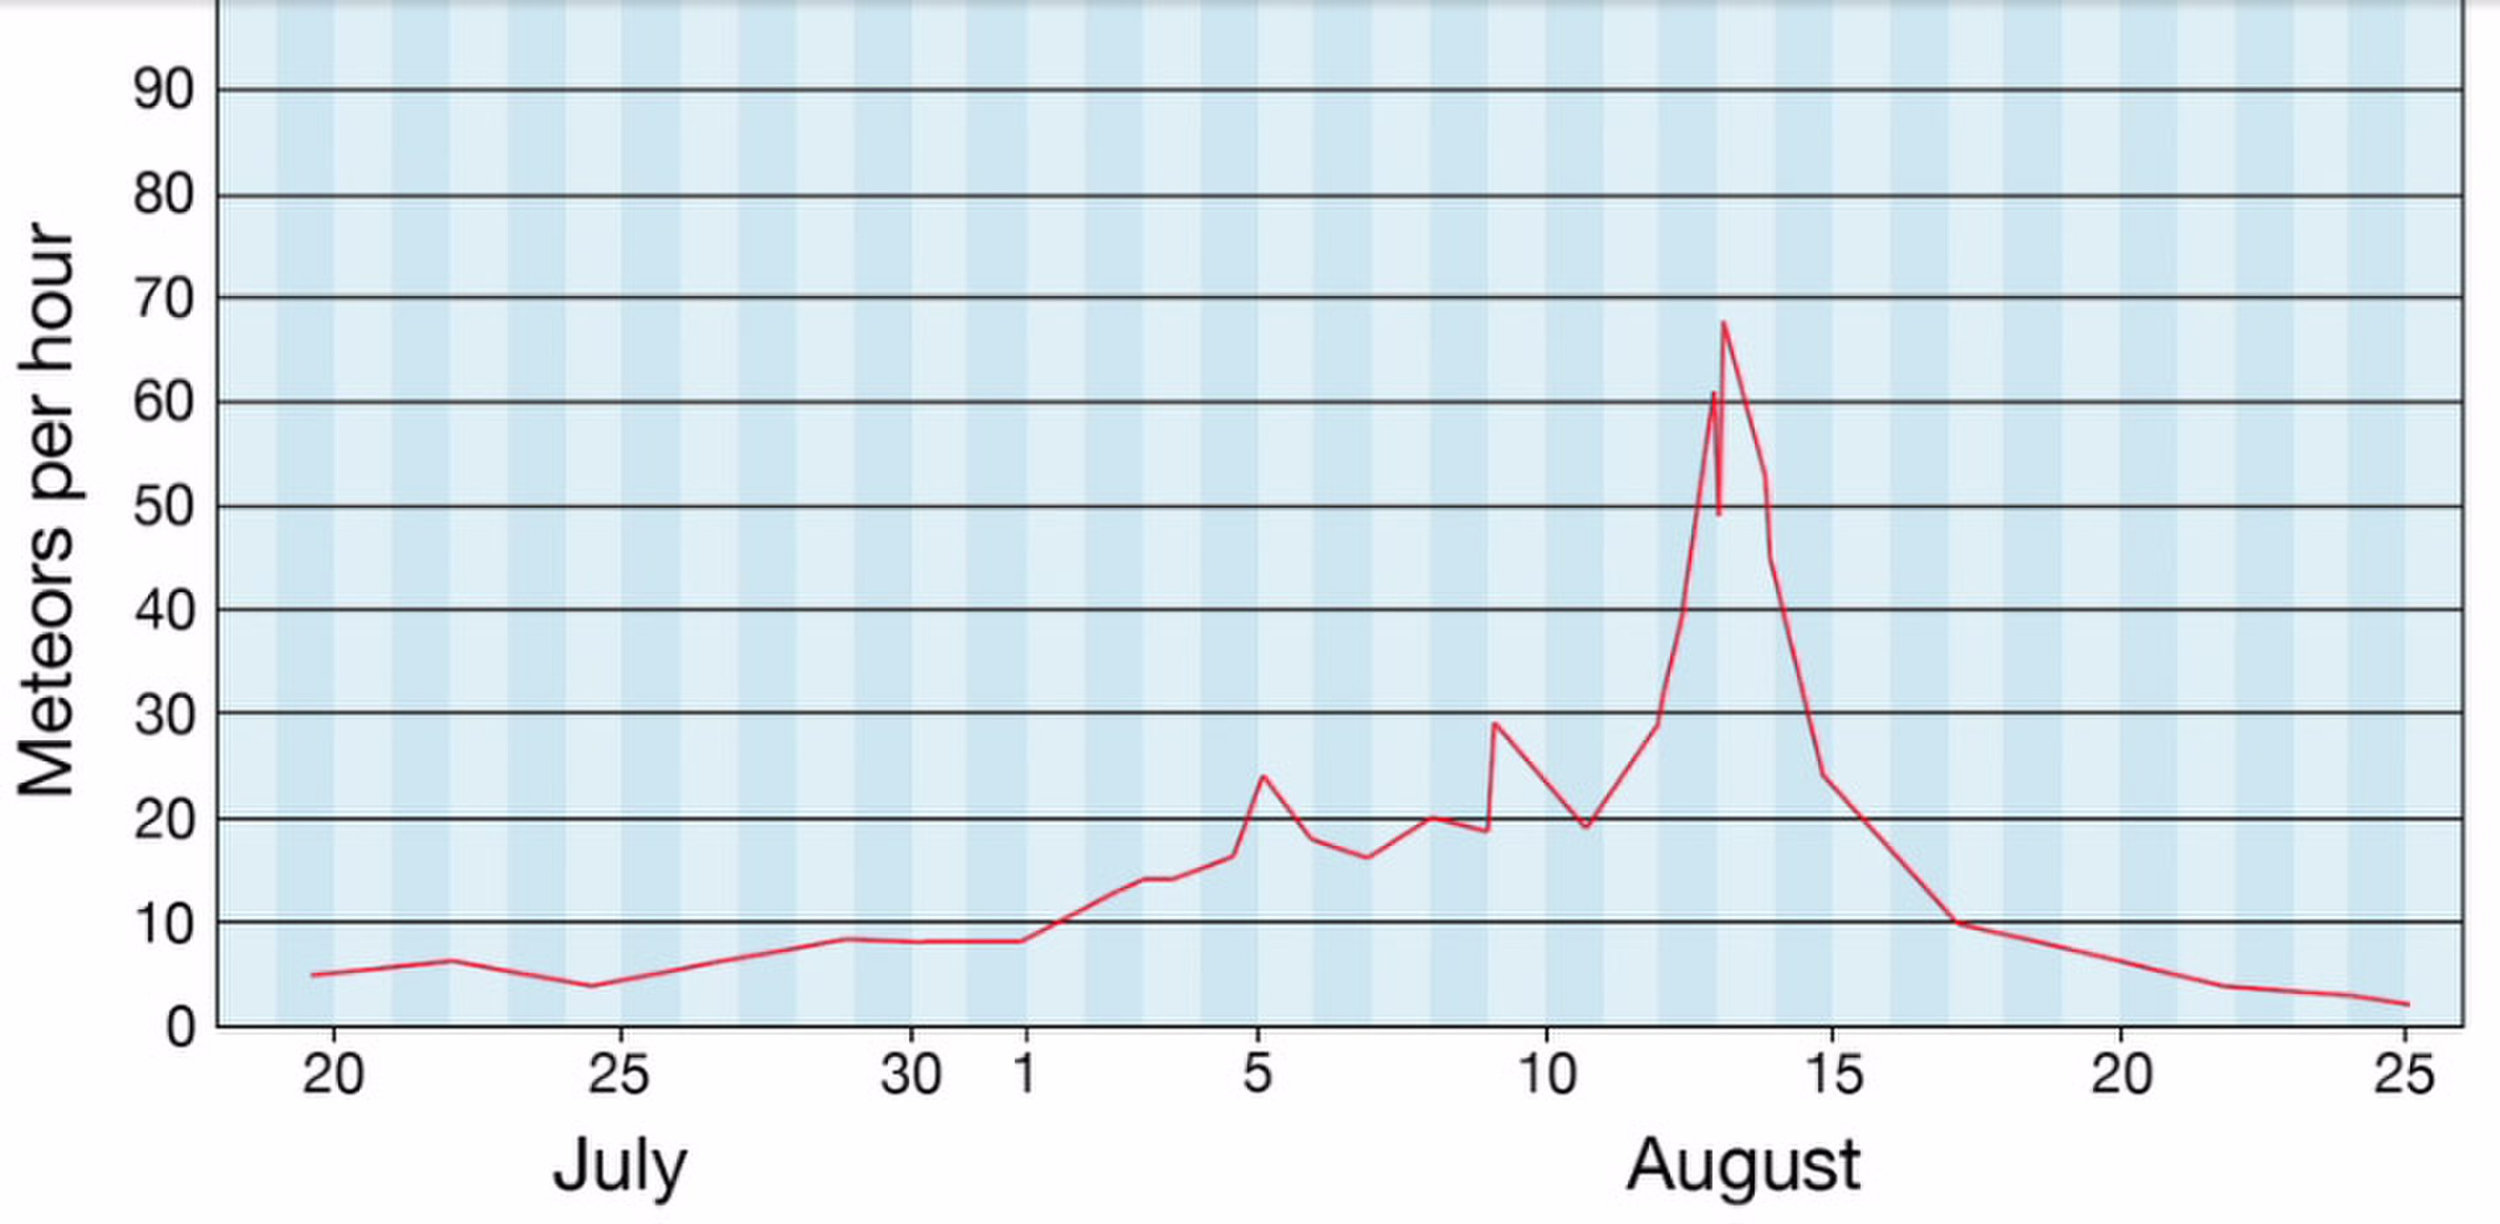
Change in the rate of Perseid's meteors (Image courtesy of NASA/JPL)
Activity also tends to pick up in the pre-dawn hours, when the radiant point in the constellation Perseus is high in the sky. But don't write off early evenings either! When the radiant point is low on the horizon there is a chance to catch a legendary earthgrazer - a long, bright, slow-burning, colourful meteor that drags across the sky parallel to the horizon. They even leave Earth's atmosphere before completely burning up. Though rare, if you're lucky enough to see one it will stick with you forever.

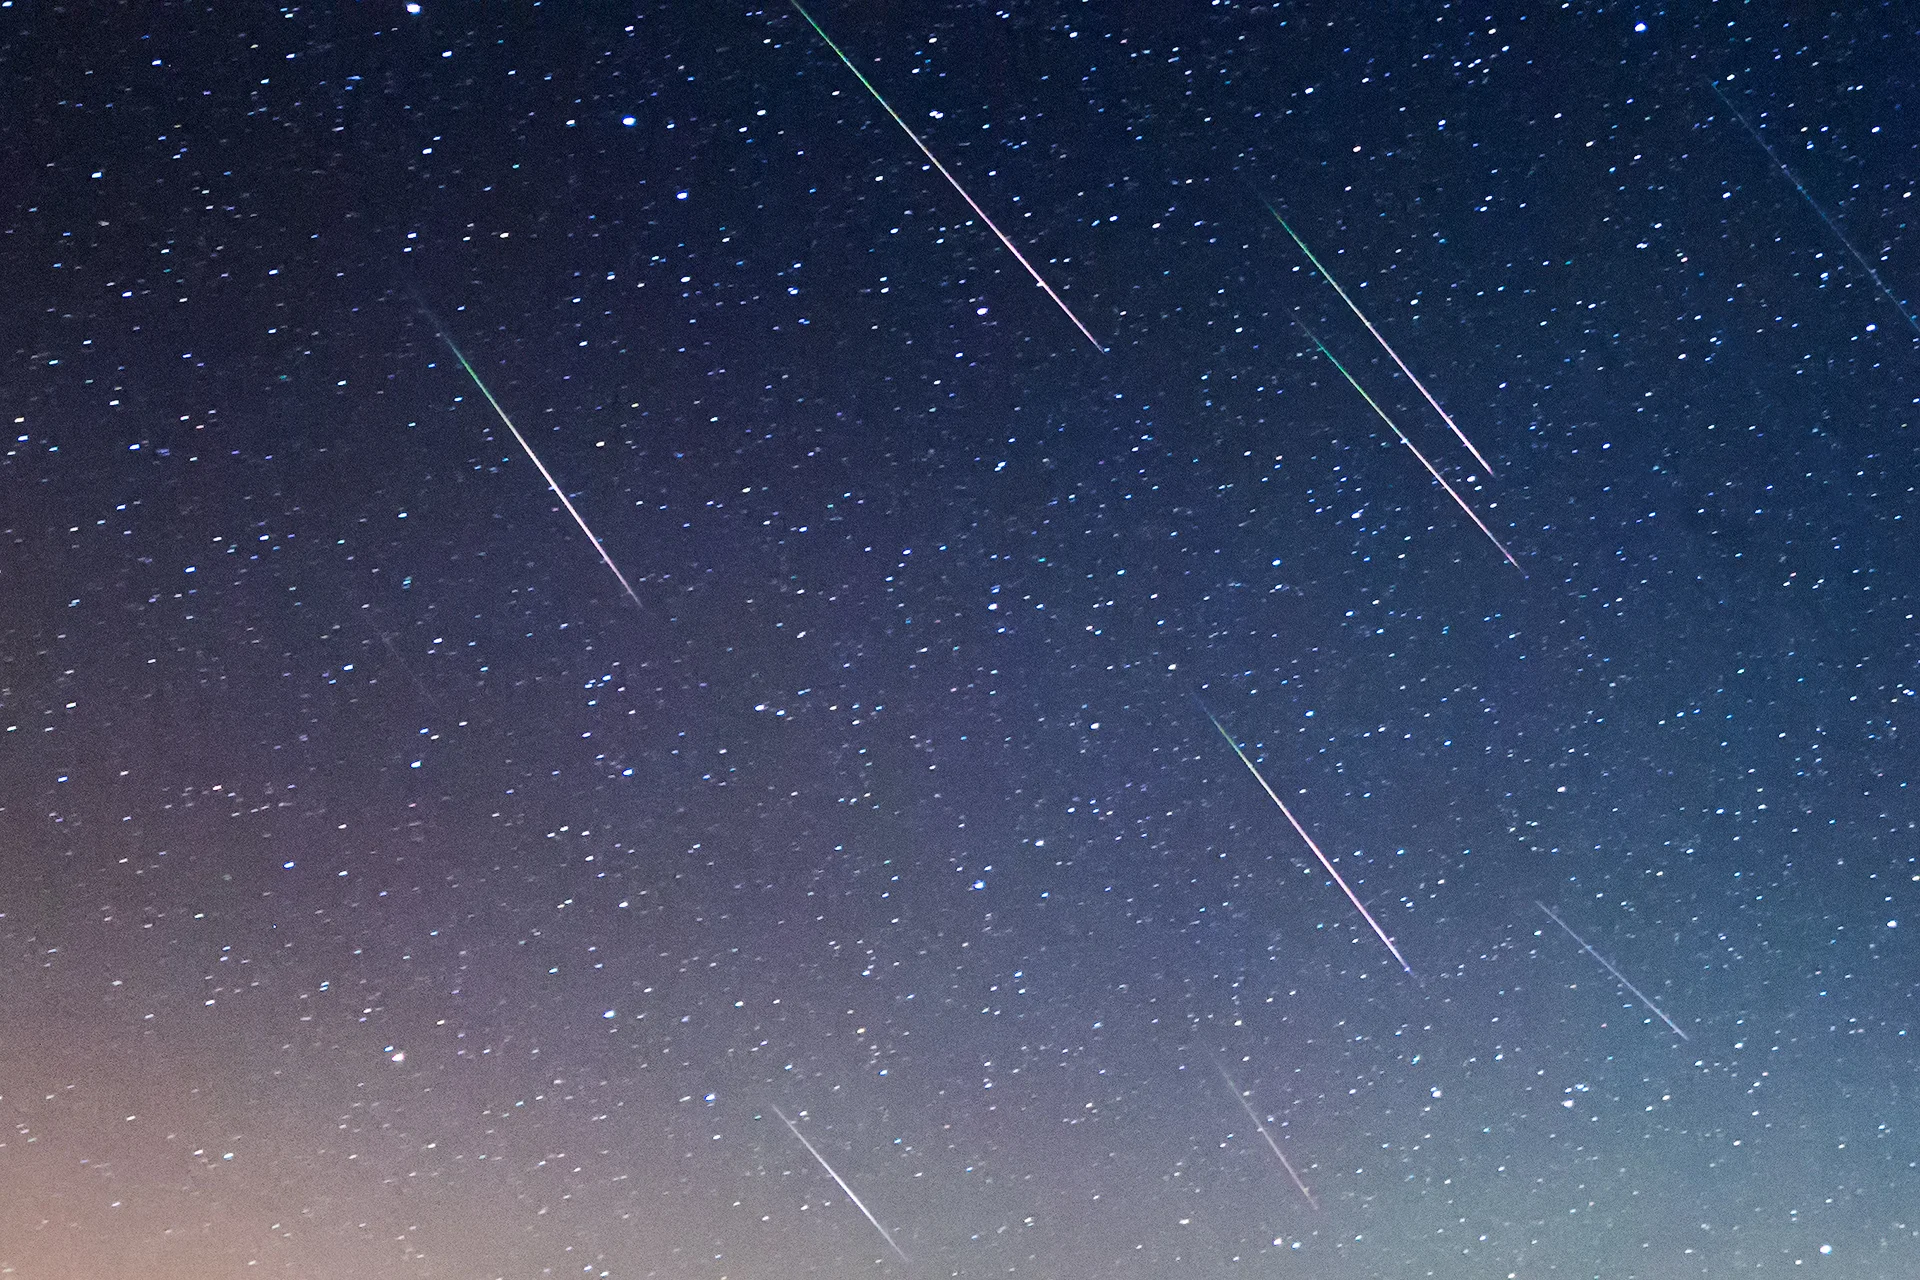
Some Perseids in the Brecon Beacons, a couple of days before the peak
Perseids meteors are fast and bright and often bring about many fireballs; meteors that are brighter than magnitude -4. They also have a very distinct pink and green colour in their tails resulting from the presence of calcium and magnesium.
CAMERA SETTINGS
You'll need a DSLR/mirrorless/bridge camera with a wide angle lens and a tripod. As for the settings:
- Aperture - A wide open aperture will allow more light to enter your camera. f/2.8 is a sweet spot for astrophotography, but f/4 is perfectly adequate if your lens doesn't open up that wide.
- Shutter Speed - Typically 20-30 secs. Go as long as you can without the stars trailing due to Earth's rotation (check out the 500 rule or the NPF rule for more accuracy)
- ISO - Somewhere in the region of 1600-6400 will be good here, depending on how well your camera handles noise at high-ISO settings.
- Focal length - Use your widest lens (I'll be going 14mm on a full-frame camera). This allows you to capture as much of the night sky as possible and improve your chances of capturing meteors. It also allows you to use a longer shutter speed as per the 500 rule. That said, you could use a longer focal length and try your luck at filling the frame with a meteor.
Set your focus to infinity and you're good to shoot! The best way to do this is to open live-view, digitally zoom on a bright star (or distant streetlight) and focus until that point source of light is as small and as sharp as possible.
To increase your chances of catching more meteors it's a good idea to shoot continuously. If your camera doesn't have any built-in timelapse functionality then pickup a cheap intervalometer from Amazon (seriously don't spend big bucks here, the cheap ones are just as good). Leave a 1 to 2-second interval between shots to allow your sensor a little time to cool down and also to make sure your camera has enough time to save the previous image to the memory card (you need to turn off in-camera long exposure noise reduction (LENR) to get the interval as short as 2 seconds).
WHERE TO SHOOT
The further you are from light pollution the more meteors you will see. To find your nearest dark skies use a website like http://www.lightpollutionmap.info. Also take into account the direction you will be shooting as distant light pollution can bleed into the sky from the horizon.
Go somewhere where you can have some solid foreground interest too, a popular landmark in your local area or maybe an interesting composition you found previously.
The Radiant Point
Meteors will burn up all over the sky but drawing a line backwards along their path will always point back to the radiant point. This is where meteor showers obtain their names, so for the Perseids the radiant point is within the constellation Perseus. If you point your camera in that direction then all the meteors will seemingly emanate out of the same point.
It's a common misconception, however, that you need to be looking in the direction of the radiant point to see the meteors. This simply isn't true. They will occur all over the night sky but the meteors close to the radiant point are coming directly towards you, so you can't see much of the big tails in their wake. If you turn 90 degrees to the radiant point then you will see the meteors fly past you, allowing you to see all the material burning up behind them (Imagine seeing a firework come straight towards you, compared to going past your side).

Radiant of the shower is found in the constellation Perseus. (Image courtesy of NASA/JPL)
HOW TO WATCH
Once you've got your camera set up and taking continuous shots you can kick back and enjoy the show. I don't advise looking up for prolonged periods so either grab yourself a deck chair or go for my preferred method of lying down on a camping mat and taking in the full 180 degrees of night sky.
Your eyes need about 20-30 minutes to adjust to the dark so that you can see more of the fainter meteors. If you need to see what you're doing try and use a dim red light as this won't reset your night vision.
Be aware that the Perseid's are known to come in bursts followed by lulls of no activity so as they say... good things come to those who wait.
Take plenty of snacks, good company, and make sure you're wrapped up warm.
BEWARE LENS FOG

Telescope dew heater hooked up to a 12V power-drill battery
One of the challenges of shooting on a humid summer's night is dew. When the glass of your lens cools to below the dew point temperature moisture in the air begins to condense on the front glass element. To prevent this from happening you need to keep your lens warm. A nifty solution for this is a CooWoo lens warmer powered by a portable USB battery or you could even strap some hand warmers around your lens.
EDITING THE SHOTS
Edit the shots to your taste, I'm not going to do a start-to-finish guide here but one technique I like to use for meteor showers is to take all the images with meteors and stack them in Photoshop using a 'Lighten' blending mode for the layers and some layer masks to tidy everything up. I'd advise you to only use the shots collected from the same tripod position and to get the meteors to line up with the radiant point you'll need to rotate each exposure a bit to counter-act the rotation of Earth (though if you use a star tracker they will all be lined up already). Et voila!
If you have any questions please feel free to ask away in the comments section below.
Good luck and clear skies!